Thursday, December 15, 2011

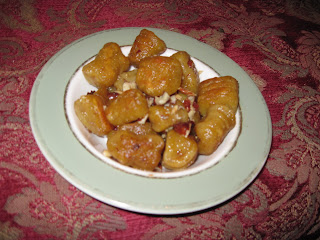
Dark Days Challenge: Pumpkin Gnocchi

More fun with pumpkin. And dough!
So that extra pumpkin that got roasted when I made soup the other day is destined for pasta. The only thing better in the winter than soup is pasta.

PUMPKIN GNOCCHI WITH BROWN BUTTER AND HAZELNUTS
 Like making bread, the amount of flour used is going to vary. How much moisture is in the air? How much moisture is in your pumpkin? How much liquid do you get from 4 eggs anyway? Like making bread or pie crust, the more you do it, the better feel you get for it. And even if it doesn't come out just right, homemade bread, pie crust and pasta is still awesome.

Ingredients ( non-local items in italics)

Roasted pumpkin, approx 4 c
All purpose flour, 2-5 c
Large eggs, 4
Olive oil, 4 Tbls
Salt, 1 1/2 tsp
Butter
Toasted hazelnuts, crushed


Take the roasted pumpkin out of the refrigerator & let come to room temperature. Trust me, it is much more pleasant to work with! You want to get the pumpkin into sort of a puree type paste. A ricer would probably work fantastic here but alas, I don't have one so I used the trusty immersion blender to get rid of any large chunks and worked it down a bit with two forks. It doesn't have to be perfectly smooth, like pumpkin pie filling (blech). Let's call it rustic.
 In a very large bowl, mix together 4c pumpkin, 3 c flour and the salt. Add the eggs and olive oil and mix well. I usually start out with a fork & end up using my hands. I'm a gal without a KitchenAid mixer.

Anyway, you want to end up with a soft but not sticky dough. Add flour a little bit at a time. Don't end up with an overly stiff dough like I did.
No biggie; I just added a bit more olive oil & a few flecks of water. Less flour would have let the roasted pumpkin shine through, though. Next time.

Lightly dust counter top & hands with floor. Scoop out a bit of dough & cover remainder. Roll into a long log, finger thick, and slice into 1 inch pieces. I just used fork tines to make pretty little ridges but you could really skip that all together. Repeat with remaining dough.

This makes a fair amount of gnocchi but they freeze beautifully. Lightly dust a cookie sheet or two with flour so the gnocchi doesn't stick, and place them on the sheets without touching one another. Pop in the freezer long enough that they harden a bit and then they can be stored in a baggie or container in the freezer.

To serve:
Drop handful of gnocchi at a time in salted boiling water. They will rise to the top of the pot when cooked; just scoop them out with a slotted spoon. In the meantime, brown a bit of butter in a pan until it begins to darken & smell nutty. Remove from heat, add chopped toasted hazelnuts, and toss with cooked gnocchi.
(Sometimes I cheat & toss the gnocchi into the frying pan with the browned butter. Just enough that it blisters & crisps the outside. No one else likes it this way - that's ok, more for me. Also, a handful of fresh chopped sage tossed into the browned butter is amazing.)

Saturday, December 10, 2011

Dark Days Challenge: Pumpkin Soup

Yes, I'm still behind & back dating posts...

Until recently, I despised pumpkin. When I started focusing on local foods & eating with the seasons, I knew I would have to ahem, expand my palate. Pumpkin was my last hold out.
I finally realized that like tomatoes, my dislike of pumpkin was a texture not a flavor thing. Also, savory is better than sweet.

ROASTED PUMPKIN SOUP
 I tend to play it fast & loose with soup. Whatever is on hand is what goes in and I don't really measure anything. Leeks instead of shallots would be yummy. Half pumpkin, half acorn squash might be good. Spices? A pinch here, a dab of this. Whatever strikes your fancy. Be careful about sugar levels though. Some of the sugar pumpkins are plenty sweet on their own, so season to taste. You can always sweeten it up at the end.
Ingredients   (non-local in italics) 
Sugar pumpkin, 2 smallish
onion
shallot
garlic
olive oil
vegetable and/or chicken stock
heavy cream
maple syrup

nutmeg
cardamom
cumin
saffron
salt & pepper
 
Heat oven to 375.
Cut pumpkins in half and remove seeds & stringy fibers. Slice into quarters (or eighths, depending on size of your gourds), place in baking pan & drizzle generously with olive oil, tossing to coat. Leaving the skins on, slice onion and shallot in half and slice top off of head of garlic. Drizzle with olive oil, making sure papery bits have enough oil so they won't burn.

Roast until soft & tender (approx 20-30 minutes), then let cool enough to handle.
 Once cooled, scrape flesh from pumpkin pieces. (Roast & scrape extra and refrigerate. Pumpkin gnocchi up next!)

Place half of roasted onion, half of roasted shallot & maybe a tsp of roasted garlic in soup pot. Add the rest of the mashed pumpkin and 3 cups stock, and puree using hand blender. Add a few threads of saffron, if you have it. (Not too much - it's expensive! I'm not sure I could even taste it but it does give the soup a richer color & it makes me feel fancy.) Add a pinch each of cumin & cardamom and few pinches freshly grated nutmeg. Add salt & pepper to taste. Add some of the oil that the vegetable were roasted in.

Heat on medium-low for approx. half hour. Drizzle in a bit of maple syrup (or brown sugar). Taste as you go, adding more roasted onion, shallot or garlic as you see fit and more stock to reach desired consistency. (Man, do I love my immersion blender for stuff like this! It's just a cheapie that I've had forever & it may need replacing soon. I singed the cord on a burner the other day. Anyone have a favorite replacement?) Before serving, add a bit of heavy cream (maybe 1/4c) and stir until heated throughout.
It won't win any beauty contests (yeah, it looks disturbingly like baby food) but it changed my mind about pumpkin. Although I still hate pumpkin pie.

Monday, November 28, 2011

Dark Days Challenge: Thanksgiving

Once again, I'm behind. While I haven't been posting at all, I have been cooking.

Thanksgiving came & went... It is my favorite holiday & this year I was lucky to have five of my friends join my little family for dinner. No photos - too much chaos & wine (Washington state wine!) for that. I did manage to include quite a bit of SOLE foods without much effort. Heritage Turkey from Bernie Nash at Mad Hatcher Farms, potatoes, corn, onions, and apples from Pleasant Ridge Farm, hazelnuts in the stuffing from Holmquist Farm, cream and raw milk from Pure Eire Dairy, and other produce from various Washington state growers purchased at PCC Market.
Was it 100% local? Heck no. But I would estimate 50-75% of it was and that's pretty darn good. And no way am I giving up homemade chocolate pie on Thanksgiving! (Hey, I did make the pie crust from Shepherd's Grain flour - also used for rolls - and lard I rendered myself.)
The biggest hit of the night was my pickle tray; pickled blueberries and blueberry ketchup, pickled Sweetheart cherries and sweet preserved cherries, and an assortment of cucumber pickles. One of my friends helped make the blueberry ketchup with me in August; it was her first time canning. It was fun to watch her get excited when people remarked, "Wow, you guys made this!?" My friend Scott made us promise to take him blueberry picking next summer and he wants to learn to can now, too.
So never mind that I forgot that I don't own a carving knife and Scott's husband had to pretty much tear apart the bird with his bare hands. Good friends, good food, good times AND I brought two more people over to the dark side of canning. I'd call that a success.

Saturday, November 19, 2011

Mid-November

Already? How did that happen? I'm a bad blogger. (Am I even allowed to call myself a blogger with only one post up? See, this internal monologue is why nothing ever makes it onto the blog. Also, I just went back to school this semester after many, many years and it is seriously taxing my middle-aged brain.)

Anyway. Autumn. My favorite season and it is nearly over here in the northwest. We may even get snow tomorrow, which will cause me to curl up in a fleece covered little ball and cry into my cocoa. Which truth be told, hot cocoa was the extent of tonight's "cooking." Another reason I don't have children; hot chocolate & toast isn't exactly a balanced meal. But tomorrow, there will be soup making, and pot roasting and picking up of my Thanksgiving Heritage Turkey. This will be the first time I've made (or eaten, for that matter) a heritage bird so any tips would be greatly appreciated. 

It's nearly that time of year again...
Went to my favorite nearby farm recently & stocked up in preparation. In lieu of actual cooking, photos of the farm.


(I just realized I can tonight's sad non-dinner could be used in the Dark Days Challenge. Theo peppemint sipping chocolate, made with Pure Eire milk, bread made with Sheperd's Grain Stone Buhr flour, and homemade blueberry jam. Yeah, I'm trotting that out come January when I can't muster any more enthusiasm for winter squash.)

And with all the heritage that, grass fed this that I've been throwing around, I would like to admit the countdown to the arrival of TJ's Peppermint Jo-Jos is on. I'll be the crazy lady piling them in my cart the second they hit the shelves. And I don't share. 

Saturday, October 15, 2011

Pink Pearl Apple Preserves

Every fall, I wait for these tart little beauties to arrive. The season is short, in a blink & you'll miss it way, and they aren't easy to find but are they ever worth it. They're small & misshapen and usually a dull yellow; some years they show only the faintest blush on the skin. I think they benefited from the wacky weather we had in the Northwest this year because these ladies are already flirting & showing off.
Slice them open and you get this...
They're crisp & tart and perfect for baking. I thought they would make a brilliant jelly this year. (And ok, I've been busy and I still had 10lbs of them sitting around. They're not great for long term storage - another reason you don't really find them in stores.) I usually find apple jelly to be too sweet but as these are fairly tart apples, I think they are perfect for jelly. Also, I had some trouble getting this to set but I really should have made this within a few days of bringing them home rather than letting them sit in the house for 2 weeks.

Pink Pearl Apple Jelly

4 lbs apples, cut and quartered (skins & core intact)
6 1/2 cups water
3 1/2 cups sugar (I might try cutting it to 3c next time)
3 tbls lemon juice

Wash & quarter the apples without peeling or coring them. (We want all that natural pectin!) Put in a large, heavy pot and cover with water. Bring just to a boil, then simmer for approximately 1/2 hr until the apples are soft & pulpy and slipping away from their skins.
Strain the mixture through a boiled jelly bag or layers of cheesecloth. (True confession time - I use cloth diapers. New ones, obviously! Gerber makes a super thin flat fold one that I can't imagine using for its intended purpose but they're great for straining. Just boil one, wring it out well, then line a colander with it & you're good to go.) It may take a few hours to drain completely but don't get impatient and squeeze. You'll end up with cloudy juice. Strain the juice a second time (this only takes a minute but ensures you get that lovely clear jewel-like jelly.)  Refrigerate juice overnight.
(Don't throw away that pulpy mess left in your cheesecloth (or diaper, as the case may be)! We're going to use it to make applesauce later!)

The next day, prepare your pot, jars & lids for canning. (Anyone new to canning, head straight to Food in Jars. Marissa has great instructions & tips, especially for beginners. Also, Pick Your Own and The National Center for Home Food Preservation are great resources.) Place a small plate or two in your freezer in order to test your set later on.
Scoop out 6 cups of your juice into a large, heavy nonreactive pot, taking care not to stir up any sediment that might be at the bottom of your bowl. Add the sugar & lemon, then heat gently to dissolve sugar.
Bring to a boil and bring to jelling point (220F). Usually, I test my set by spooning a small amount of the jelly on the frozen plate, placing it back in the freezer for 1 minute, then push your finger through the jelly & see if it wrinkles. If so, you're ready to can. If not, keep heating it & test again. This time, I relied on the thermometer. It read 225F so I assumed I was good to go. Ended up having to redo it, which was a pain but hey, it happens.
Ladle the hot jelly into sterilized jars, leaving 1/4" headspace and water bath process for 5 minutes. Makes 6 1/2 pint jars.


There's a bit of the pink applesauce there on the right hand corner; instructions next time.